If you’ve ever spawned into a new survival world and ended up dumping half your inventory on the ground because you ran out of space mid-mining run, you know how frustrating it is to come back later and find all your resources gone. That’s why knowing how to craft a chest in Minecraft is one of the first skills you should learn, before you even go looking for iron or build a base to sleep in. I still cringe thinking about my first ever Minecraft world, where I went three whole hours without crafting a chest, lost all my first diamond ore after a creeper snuck up on me, and had to start from scratch. I don’t make that mistake anymore, and you won’t either after this guide.
What You Need to Craft a Chest in Minecraft
The recipe for a standard vanilla chest is one of the simplest in the entire game, and you only need one core material to make it: 8 wooden planks of any type. You don’t need any special tools, rare resources, or access to specific biomes to pull this off, which is why you can craft a chest within minutes of spawning into a new world. You can use any combination of wood plank types for a standard chest — the wood type only changes the chest’s appearance, not its storage capacity or function, so you can mix leftover planks from different trees without wasting anything.
To get the 8 planks you need, all you have to do is punch two full tree logs with your fist (or any tool, if you already have one). Each log converts to 4 planks in your personal 2x2 crafting grid, so two logs give you exactly the 8 planks you need for one chest. If you’re playing a modded version of the game, some custom mod packs may adjust the recipe to add extra materials, but this 8-plank rule works for all Java and Bedrock vanilla versions, including experimental snapshots. You’ll also need a 3x3 crafting table to assemble the chest, which you can make with 4 planks in your personal crafting grid if you don’t already have one placed.
Step-by-Step Crafting Process for a Standard Chest
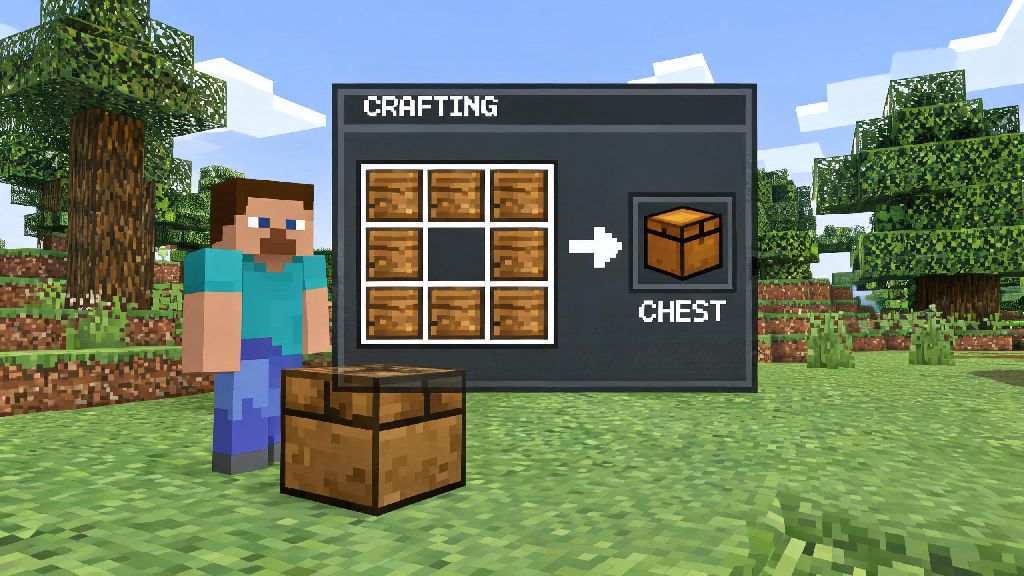
Once you have your 8 planks and a crafting table, putting the chest together takes less than 10 seconds. First, place your crafting table down on any solid block and right-click to open the 3x3 crafting grid. Fill every slot in the grid except the very center one with your wooden planks: that means 3 planks across the top row, one plank in the left and right slots of the middle row, and 3 planks across the bottom row, leaving the middle middle slot completely empty. Planks placed in any order around the empty center slot will work, so you don’t have to worry about following a strict side-by-side placement pattern as long as the center is clear.
Once you fill the 8 slots correctly, a chest icon will appear in the result slot to the right of the grid. Click it to move the chest to your inventory, and you’re done. Place the chest down on any solid block, right-click it to open, and you’ll have 27 empty slots to store all your extra resources. Place two chests directly next to each other, and they’ll automatically merge into a double chest with 54 total storage slots, perfect for bulk storage of common blocks like cobblestone or dirt.
New players often make small, avoidable mistakes when crafting their first few chests, so keep these common pitfalls in mind:
If you regularly play on public survival servers, you don’t have to worry about losing your items to random players if you use the right protection tools. You can look into Minecraft chest locking plugins that most popular servers enable by default, which let you mark chests as private so only you can open them. Always test the protection with a cheap item like dirt before you store all your diamonds or netherite gear in a new server’s chest, just to be safe.
Creative Uses for Chests Beyond Basic Storage
Chests aren’t just for stashing extra cobblestone when you’re mining — they’re one of the most versatile decorative and functional blocks in the game for both survival and creative mode builds. For home builds, chests make perfect kitchen cabinets, warehouse crates, or even market stall displays if you rename them to match what’s inside. You can also use them to build fake treasure piles for adventure maps, or hide them behind decorative blocks to add secret rewards for players who explore thoroughly.
Trapped chests are a fun variation you can craft with a standard chest and a tripwire hook, which sends a short redstone signal every time someone opens it. You can use these to prank friends on multiplayer servers by hooking them up to a TNT trap, or connect them to a hidden piston door to create a secret entrance to your base that only you know how to trigger. Trapped chests look almost identical to regular chests, so most players won’t notice the difference until it’s too late.
You can also pair chests with hoppers to build automatic item sorting systems, so you don’t have to manually organize every block you bring back from a mining trip. My current survival base has a sorter that automatically sends cobblestone to one chest, iron ingots to another, and rare drops like netherite scraps to a separate hidden chest, which cuts down my organization time by almost 80%. For cross-dimensional storage, ender chests (crafted with 8 obsidian and one eye of ender) let you access the same 27 storage slots from anywhere in the Overworld, Nether, or End. Ender chests are completely private even on public multiplayer servers, so no one else can access your items even if they find and break the ender chest block.
Pro Tips to Get the Most Out of Your Minecraft Chests
After thousands of hours playing Minecraft, I’ve picked up a few tricks to make chest storage way more efficient, even if you’re the type of player who hoards every single block you mine. First, rename your chests with an anvil before you place them, or use a name tag on an already placed chest, to label exactly what’s inside. I name all my storage chests by broad category first — “Building Blocks”, “Food & Consumables”, “Tools & Armor” — then add more specific labels for rare resources, so I never have to open 10 chests to find the stack of baked potatoes I need before a raid.
If you need even more storage space, place shulker boxes inside your chests. Each shulker box holds 27 items of its own, so a double chest filled with shulker boxes gives you 1,458 total storage slots, which is more than enough for even the most dedicated hoarders. Shulker boxes keep their contents even if you break them, so you can carry entire storage systems with you when you move bases instead of making 20 trips back and forth to move all your items.
Another key tip: never place your main storage room right next to exterior base walls, or build it out of flimsy blocks like wood. Creepers, ghast fireballs, and TNT can blow up chests and destroy all the items inside permanently, so it’s worth building your main storage area out of blast-resistant blocks like obsidian or deepslate, and keeping it at least 10 blocks away from any outside walls. If you’re playing on a hard mode server, you can even add an iron door or redstone lock to your storage room to keep mob griefers and unwanted visitors out.
At the end of the day, even with all the fancy storage options like shulker boxes and ender chests available in the game, knowing how to craft a chest in Minecraft is the foundation of every good base, every long survival run, and every creative build. It’s one of the simplest recipes in the game, but it’s also one of the most impactful — without it, you’d be stuck carrying only 36 items at a time, and you’d lose most of what you collect every time you die. Whether you’re a brand new player crafting your first chest 10 minutes after spawning, or a veteran player building a massive automated storage system for your endgame base, chests are a core part of the Minecraft experience that you’ll use thousands of times across every world you play.