Decorating your Minecraft base can feel just as rewarding as beating the Ender Dragon or building a fully automated crop farm, and few decor items offer as much flexibility as custom wall art. If you’re wondering how to make painting in Minecraft and use it to elevate every build from a tiny survival hut to a sprawling fantasy castle, this guide walks you through every step, from basic crafting to secret placement hacks most players don’t know about. We’ll cover both survival mode crafting rules and creative mode customization tricks, so you can get the exact look you want no matter how you play.
How to Make a Painting in Minecraft for Survival Mode
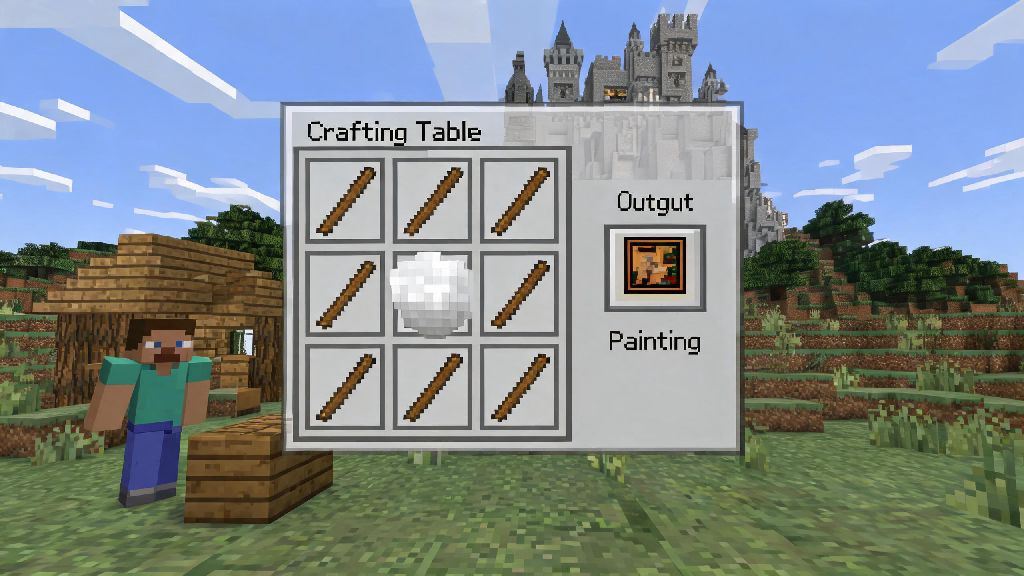
Crafting a basic painting requires almost no rare resources, making it one of the most accessible decor items for early-game survival players. You only need two core materials to craft one painting: 8 wooden sticks, and 1 piece of wool of any color. You don’t need any special crafting stations either, just a standard 3x3 crafting table to put the items together.
To assemble the recipe, place the single piece of wool in the center slot of the crafting grid, then fill all 8 surrounding slots with wooden sticks. Important note: You can use any type of wood for the sticks, no need to match wood types for the recipe to work. Once you arrange the items correctly, you’ll get one painting item that stacks up to 64 in your inventory. The color of wool you use does not affect the design of the painting you get when you place it, so you can use leftover wool from sheep farming or bed crafting without worrying about mismatched results.
So if you’re playing on a tight resource budget, you can easily make 10+ paintings with just one stack of wood and a few pieces of wool, no diamonds or rare nether materials required. That makes them perfect for sprucing up a starter base before you have access to more expensive decor like glazed terracotta or shulker boxes.
Placement Tips to Get the Exact Painting Design You Want
Many new players get frustrated when they place a painting and get a random tiny design instead of the large landscape they wanted, but the fix for this is simpler than you think. Paintings automatically select their size based on the empty wall space available when you place them, so you can control the size by limiting the area you place them on. Common painting sizes range from 1x1 (one block tall, one block wide) up to 4x4, with landscape options like 4x2 and 4x3 also available.
If you want a specific size, mark out the wall space with temporary blocks before placing the painting to avoid smaller random designs popping up. I’ve spent way too long breaking and replacing paintings to get the perfect Wither landscape for my nether base, so trust me when I say marking out the wall space first cuts that time in half. If you don’t get the specific design you want on the first try, just break the painting and place it again to reroll the options until you find the right one.
A lot of players like to use custom painting assets to add personal touches to their worlds, like fan art of their favorite characters or images of their real-life pets. Many community creators share free custom painting packs on fan sites, and one popular resource for curated, copyright-safe custom painting designs is Ever777. These custom packs are easy to install if you’re playing on Java Edition, and work for both single-player worlds and multi-player servers that allow resource packs.
If you’re using custom painting packs, always double check that they’re compatible with your game version to avoid missing texture errors. Most creators list compatible versions in their pack descriptions, so you won’t have to deal with weird glitches or broken art in your builds.
Fun Creative Uses for Paintings Beyond Basic Wall Decor
Paintings aren’t just for hanging on empty walls — you can use them for all sorts of clever build tricks that make your worlds feel more unique and functional. One of the most popular uses is for hidden doors, which let you hide secret rooms, storage areas, or mob farms behind seemingly normal wall art. You can place a painting over a fence gate, wooden door, or even a 1-block gap to create a seamless entrance that other players won’t notice at first glance.
Pro tip: Use a 2x1 painting over a fence gate for the most seamless hidden door, as it won’t have gaps that give away the entrance. You can even add a pressure plate or button on the other side of the wall to make the door open automatically when you walk up to it, no manual pulling required.
There are dozens of other creative uses for paintings if you get creative, including:
You can also combine paintings with item frames and banners to create layered wall art that looks far more unique than default decor. For example, hanging a small painting next to an item frame with a potted azalea and a small banner creates a cute gallery wall look that works for almost any build style, from cozy cottage to high-tech modern base.
Common Mistakes to Avoid When Using Paintings in Your Builds
Even though paintings are simple to use, there are a few common mistakes that can ruin your decor or cause unnecessary frustration. The first and most annoying mistake is placing paintings too close to open fire sources. Paintings are flammable, so if you hang one within two blocks of open lava, a campfire, or a burning fireplace, it will burn away instantly and leave an unsightly gap in your wall.
Never place paintings within two blocks of open lava or unprotected campfires, as they can burn away instantly and leave unsightly gaps in your decor. If you want to hang art near a fireplace, add a glass barrier between the fire and the painting to protect it from burning.
Another common mistake is forgetting that paintings can be broken by other players or mobs on public multiplayer servers. If you’re playing on a PvP or anarchy server, unprotected paintings can be broken and stolen in seconds, so you should always claim your build area to protect your decor from griefers. You should also avoid hanging paintings near mob farms or areas where creepers frequently spawn, as creeper explosions will destroy all nearby paintings in one blast.
Finally, don’t use paintings that are too large for small rooms. A 4x4 painting will overwhelm a tiny 5x5 survival hut and make the space feel cramped, so stick to 1x1 or 2x1 designs for smaller spaces to keep the room feeling balanced. For larger rooms like grand halls or art galleries, you can mix and match different sizes to create a dynamic, curated look that feels intentional instead of random.
Paintings are one of the most underrated decor items in Minecraft, and learning how to make painting in Minecraft opens up hundreds of new ways to customize every part of your world. Whether you’re hiding a secret storage room in survival mode or building a full art gallery for your creative mode world, these tips will help you get the exact look you want without wasting resources or dealing with frustrating placement bugs. Next time you’re decorating a new base, grab a stack of paintings and experiment — you might be surprised at how much they can elevate even the simplest builds.