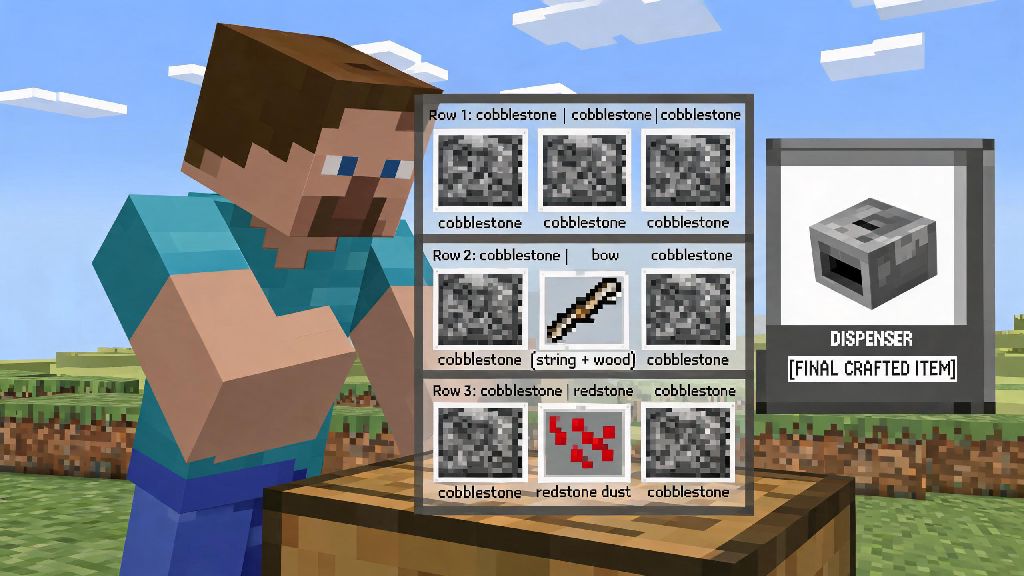
If you’ve ever wanted to build an automatic crop farm, a mob trap, or even a silly TNT cannon in your Minecraft world, you’ve probably run into the need for a dispenser. This versatile redstone component can shoot out items, place blocks, and trigger all sorts of cool mechanisms with just a simple redstone signal. Learning how to craft a dispenser in Minecraft is a basic but essential skill for anyone who wants to move past simple wooden houses and into more dynamic, functional builds. I remember fumbling through my first dispenser craft back when I started playing, wasting cobblestone and string because I didn’t check the recipe first, so I put together this guide to help you skip that frustration.
What You’ll Need to Craft a Dispenser in Minecraft
Before you even open your crafting table, make sure you have all the required materials handy. You don’t want to be halfway through the recipe only to realize you forgot to farm string for the bow, trust me. All of these items are easy to gather early in survival, so you don’t have to wait until late game to learn how to craft a dispenser in Minecraft. The full list of required items is:
If you’re playing in survival mode, you can gather all these materials within your first few days of exploring if you prioritize mining and fighting a couple of skeletons at night. For creative mode players, you can find dispensers directly in the redstone tab of your inventory, but it’s still good to know the recipe if you ever switch back to survival. Note that the bow you use for the recipe doesn’t need to be fully repaired – even a bow with half durability will work just fine, so don’t waste a brand new one if you have a beat-up old bow lying around from fighting mobs.
Step-by-Step Crafting Process for Your Dispenser
Once you have all your materials together, the actual crafting process takes just a few seconds if you follow the layout correctly. First, open your 3x3 crafting table interface – you can’t craft a dispenser in the small 2x2 inventory grid, so make sure you’ve placed a crafting table down first. Arrange the materials in the following order: place cobblestone in every slot except the middle of the top row and the very center slot. Put the bow in the middle of the top row, and the redstone dust in the center slot of the grid.
If you’ve placed everything right, the dispenser icon will pop up in the result slot to the right of the crafting grid. Click it to move it to your inventory, and you’re done. If you follow this layout exactly, you’ll nail how to craft a dispenser in Minecraft on your first try. Double-check the placement of the bow and redstone if you don’t see the dispenser show up – it’s really easy to mix up the bow slot with the redstone slot if you’re rushing, and that’s one of the most common mistakes new players make. If you’re playing on a server with custom crafting recipes, this vanilla recipe might not work, but that’s extremely rare unless the server explicitly says they’ve changed basic redstone recipes.
Practical Ways to Use Your New Dispenser
Now that you have your dispenser, you might be wondering what you can actually do with it besides leave it sitting in a chest. Most experienced players learn how to craft a dispenser in Minecraft early on because it’s so useful for quality of life builds. Dispensers are one of the most versatile redstone components in the game, and they work for both practical survival builds and fun creative mode projects.
One of the most popular survival uses for dispensers is automatic crop harvesting – fill a dispenser with bone meal, hook it up to a redstone clock, and point it at your wheat or carrot farm to automatically grow and harvest crops without you having to lift a finger. You can also use dispensers to build automatic mob traps: fill them with arrows, hook them up to a pressure plate or tripwire, and they’ll shoot any mob that walks past without you having to stand guard. For creative mode players, dispensers are perfect for building TNT cannons, firework displays, or even automatic armor equipping stations for your base. I recently built a dispenser-based snowball fight arena for my friends on our survival server, and it’s become one of the most popular spots on our whole world. If you want to get extra fancy, you can hook multiple dispensers up to the same redstone circuit to trigger them all at once for bigger effects.
Common Mistakes to Avoid When Working With Dispensers
Even if you nail the process of how to craft a dispenser in Minecraft, you can still run into issues when placing and using it. I’ve made every one of these mistakes at least once, so I can tell you exactly what to watch out for. First, make sure you place the dispenser facing the right direction. When you place a dispenser, it will face towards you, so if you want it to shoot away from your base, stand on the side you want it to face away from when you place it.
Dispensers will not work if they don’t have a direct redstone signal – you can power them with a lever, button, pressure plate, redstone torch, or redstone dust, but the signal has to be connected directly to the dispenser or the block behind it. Another common mistake is filling the dispenser with the wrong items for the job: if you want it to place water, you need to put a water bucket in it, not just a bottle of water. If you want it to shoot arrows, you have to fill it with arrows, not a bow. Don’t place dispensers next to flammable blocks if you’re filling them with fire charges or lava buckets – it’s really easy to accidentally burn down your entire base if you’re not paying attention, and I’ve had to rebuild three different bases because of that exact mistake. If you’re having trouble getting your dispenser to work, break it and place it again first – sometimes a glitch with the redstone signal will stop it from working, and replacing it usually fixes the issue right away.
There’s no limit to the cool builds you can make once you know how to craft a dispenser in Minecraft, from simple automatic farms to elaborate redstone contraptions that make your survival life way easier. Take some time to experiment with different placements and redstone hookups, and don’t be afraid to mess up – even the most experienced redstone builders waste a few dispensers when they’re testing new builds. If you’re still having trouble with the recipe, just pull up this guide again next time you’re at your crafting table, and you’ll have your dispenser ready in no time.