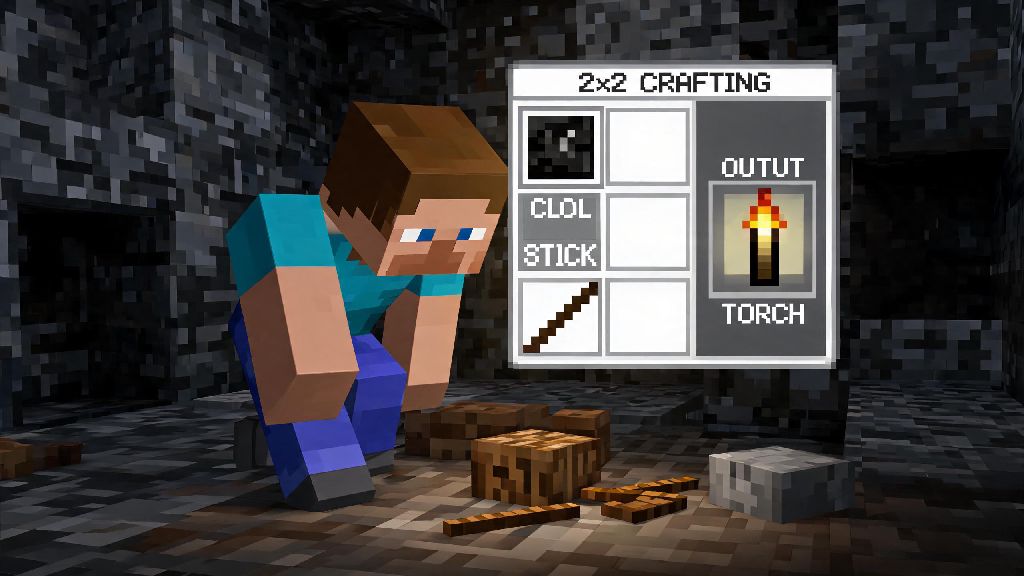
If you’ve ever spawned into a new Minecraft survival world as the sun dips below the horizon, you know that panic of scrambling for light before creepers start creeping around every corner. The first solution almost every player reaches for is the humble torch, and learning how to make torches in Minecraft is one of the first core skills that separates new players from those who can make it through their first night unscathed. I still remember my first world, where I spent 10 minutes fumbling with the crafting menu trying to figure out the recipe before a zombie snuck up behind me and sent me back to spawn. You don’t have to make that mistake.
How to Make Torches in Minecraft: Exact Crafting Recipe
Once you have your materials gathered, the process is super straightforward, no fancy tools required. You don’t need a crafting table to make torches — you can craft them right in your 2x2 personal inventory grid, which is a lifesaver when you’re stuck deep in a cave with no workbench nearby. The recipe only calls for two items: 1 stick, placed in the bottom slot of the crafting grid, and 1 piece of coal or charcoal, placed directly above the stick. This recipe gives you 4 torches per craft, which is more than enough to get you through your first few nights. Charcoal is the most accessible option for brand new players, since you don’t have to dig for coal ore to get it. All you need to do is punch 3-4 tree logs, craft a small furnace out of 8 cobblestone, and smelt one log in the furnace with another log as fuel. You’ll get charcoal in less than 10 seconds, no mining required. If you’re further into your playthrough, coal works exactly the same as charcoal for this recipe, and you’ll usually find large coal veins just a few blocks below the surface when you’re digging for stone or iron.
Pro Tips for Efficient Torch Farming
Once you know the basic recipe, you can save a ton of time by optimizing how you gather materials and craft torches, especially if you’re planning a long cave exploration or a big build project. I’ve tested dozens of small hacks over hundreds of playthroughs, and these are the ones that make the biggest difference for me:
Torch Placement Rules You Should Follow
Crafting torches is only half the battle — placing them correctly will keep mobs from spawning near your base or in the caves you explore, and can even make your builds look more polished. Torches emit a light level of 14, which is enough to stop most hostile mobs from spawning within 7 blocks of the torch, as long as there’s a solid block under or attached to the side of the block the torch is placed on. If you’re exploring a cave, place torches every 12 blocks on the floor, or every 8 blocks on the wall, to make sure there are no dark spots where mobs can spawn. I also always place torches on the right side of cave paths when I’m exploring, so I can follow the left wall back to the entrance without getting lost. For base builds, you can place torches under glass blocks or carpets to hide them while still getting the full light level, which is great for decorative builds where you don’t want plain torches ruining your aesthetic. Never place torches on sand or gravel that could fall — if the block under the torch breaks, the torch will pop off and you'll have to pick it back up, which can leave dangerous dark spots if you're not paying attention.
Alternatives to Regular Torches for Specific Use Cases
Regular torches are the best all-around light source for most early and mid-game situations, but there are a few cases where other options work better, depending on what you’re doing. If you’re exploring the Nether, for example, soul torches are a way better pick. They emit a lower light level of 10, but they repel piglins and hoglins, so you won’t get randomly attacked while you’re looting bastions or gathering netherrack. Lanterns are another popular alternative, especially for decorative builds. They have the exact same light level as regular torches, but they look way cleaner, can be hung from ceilings, and won’t pop off if the block they’re attached to breaks. Soul lanterns are the best option for Nether base builds, since they keep hostile mobs away and fit the dark, spooky aesthetic of the dimension perfectly. Glowstone and sea lanterns are great late-game options for large builds, but they require more rare resources, so torches are still the most accessible option for most players 90% of the time. If you’re playing modded Minecraft, you’ll find tons of custom torch variants that add different effects or aesthetics, but the basic vanilla torch recipe is still the first one I craft every time I start a new modded playthrough.
At the end of the day, torches are one of the most versatile and essential items in all of Minecraft, no matter if you’re playing casual survival or working on a massive creative build. Even as you unlock fancier light sources later in your playthrough, you’ll still find yourself reaching for stacks of torches whenever you head out to explore or start a new build project. Taking the time to master how to make torches in Minecraft and use them effectively will save you dozens of frustrating deaths to mobs sneaking up in the dark, and make your entire playthrough way smoother. Next time you spawn into a new world, grab some sticks and charcoal, craft a stack of torches first, and you’ll be set to take on whatever the game throws at you.